A few weeks ago I had the opportunity to cater for the very first time for the ladies of Drifting Pretty. Needless to say the day before and the actual date was hectic but the event turned out better than expected. I'm kind of surprised because this was the first time I attempted these recipes. Heh... shame on my for being such a procrastinator but luckily my foody senses are pretty good. To make the experience even more memorable, Nadine of Sachiko Studios was kind enough to do a photoshoot for my blog. The theme for the shoot was spring and because of my natural affinity for all things Japanesey I chose to do a Japanese fusion kind of menu. The experience was awesome; you can never go wrong with good food and good company although I certainly won't mind having an assistant the next time! Apologies for not updating my site for awhile but I hope you enjoy this super epic post featuring the photography from Sachiko Studios (check out her blog here), the ladies of Drifting Pretty (check out the cool things we do here), and of course yours truly, CHIBI CHOMPS. Please enjoy my recipes for kabocha pumpkin croquettes, chashu pulled pork, and lotus root chips. We're hitting three birds with one stone in this post!


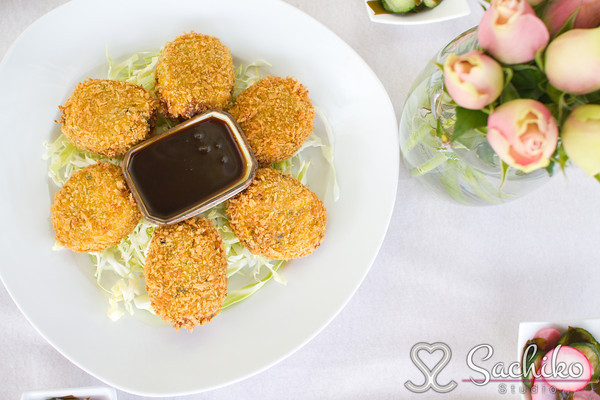 |
| Kabocha Pumpkin Croquettes |
 |
| Chashu Pulled Pork Sandwich with Lotus Chips. |
 |
| Perfect cook book cover? (; |
 |
| Drifting Pretty gals. (; |
P.S. I'd like to thank Nadine and Mark for taking these awesome pictures and of course my helpers during plating!
Chashu Pulled Pork Sandwiches
6 pounds pork (boston butt with bone)
3 cups water
1 cup soy sauce
2 cups sake
2 cups mirin
1 cups sugar
12 scallions
12 garlic cloves
2 medium shallots
6 inches of ginger
Spring veggie salad mix or vegetables of choice
Sesame Seeds for garnish
Bread
1. Place all ingredients save the pork in a crock pot and bring to boil.
2. When the mixture is simmering, place the pork in the crock pot, set a timer, and relax. (Cooking time may vary depending on the crock pot but I cooked my pork for 12+ hours and it was fall off fork tender.)
3. Remove pork from the slow cooker and allow meat to rest.
4. Take the left over juices from slow cooker and simmer to reduce the liquid. When the sauce is thickened, ladle onto the pork for extra deliciousness. (I added the sauce after assembling the sandwich so the bread absorbed the extra liquid.)
5. Assemble the sandwich and enjoy.
Lotus Root Chips
Recipe inspired by Spirit House Bar.
6 pounds of lotus root
furikake
salt
1/2 cup powdered sugar
1 tablespoon water
oil for frying
1. Heat oil to 340
°F.
2. Slice the lotus root to 2-3mm in thickness.
3. To make glaze, mix the powdered sugar and water together until smooth.
4. Fry the lotus root slices in the oil until golden brown and place on a wrack to drain the excess oil.
5. While the fried pieces are still hot, brush the chips with glaze then sprinkle with salt and furikake.
Kabocha Pumpkin Croquettes
4 pounds kabocha pumpkin
6 hard boiled eggs
1 large brown onion
2 tablespoon butter
1 can corn
2 teaspoon salt
1 pinch nutmeg
1 pinch pepper
panko bread crumbs
2 beaten eggs
flour
1. Cook hard boiled eggs, set aside the yolk, and roughly mince the egg whites.
2. Cut the kabocha pumpkin into medium sized chunks (leave the skin on) and boil in salted water until soft. (You should easily skewer a chopstick through it.) Drain and mash the pumpkin while still hot. To further evaporate excess liquid, mash over low heat. When most of the moisture has evaporated, mash in the egg yolks.
3. Mince and saute onion in melted butter until soft. Season with salt, nutmeg and pepper.
4. In the pot of mashed pumpkin, mix in the egg whites, corn (drained), and onion.
5. Divide mixture into 24 equal portions. (You can make smaller ones if you like.)
6. Make flat and oval shaped patties with the mixture. Coat each piece with flour, dip in the beaten egg, and coat with panko bread crumbs.
7. Optional: Place the finished pieces in the fridge for 30 minutes prior to frying to decrease the chances of the croquette falling apart.
8. Fry the croquettes in 340
°F oil until golden brown.
9. Serve the croquettes with bulldog sauce, ketchup, or mayonnaise if desired, and garnish with vegetables of your choice. (Typically Japanese croquettes are served with finely sliced cabbage.)