Showing posts with label japanese. Show all posts

Wednesday, May 15, 2013

Shoyu Tofu Dango


Most commonly featured in animes and Asian dramas, dango is pretty much glutinous rice balls served on a skewer. They can be easily found in Japan anywhere for about 100 to 150 yen each. Well in the USA, that's a different story. I know they can be found at a stand in Little Tokyo in LA, and of course in the refrigerated section at your local Japanese market, but sometimes that may be a whole lot of trouble for something that can be so easily made. This recipe is a modification of ochikeron's recipe from youtube. The dango she makes look good but I do not entirely agree with putting potato starch in the shoyu sauce; it's just not traditional. Not that I am an expert at being Japanese or anything but here you go! (;

Shoyu Tofu Dango

Dango:
100 grams shiratamako flour
140 grams silken tofu, drained
1 teaspoon sugar

Sweet Shoyu Glaze
1 tablespoon shoyu
1 tablespoon mirin
1 tablespoon water
2 tablespoon brown sugar

1. Bring a pot of water to boiling.
2. Meanwhile, combine the shiratamako, tofu, and sugar together. Knead until soft but not sticky. Add a little bit more flour or water until the right consistency is reached. ("soft like an earlobe")
3. Separate the dough into twelve equal pieces and roll into round balls. Place the dango balls into the pot of boiling water until it floats to the surface. Allow to boil for an additional 2 minutes.
4. When the dango are finished cooking, immediately place them in a iced water bath for 1 minute. Strain and remove the dango from the iced bath.
5. Now we can make the shoyu glaze! Place all the ingredients in a small pot and heat under medium heat. When the sauce is bubbling, turn off the flame and allow to thicken.
6. Pour or brush the shoyu glaze onto the dango skewers and serve!

Wednesday, April 17, 2013

Green Tea Marble Chiffon Cake


As an avid green tea lover, I love all things green tea. Green tea candy, green tea drinks, green tea sweets, green tea! I decided to make this cake on a whim and loved it so much that I made the same cake in two consecutive days. It is so good that the first one was devoured within 24 hours. The original recipe of this cake came from Cosy Bake, however I ended up tweaking the recipe because it was extremely difficult to combine matcha paste homogeneously with batter. During the first attempt, there was pretty much huge undissolved chunks of matcha. I tried to combine it as best I could but the over mixing just destroyed the fluffiness of the whipped egg whites. In an effort to curb that problem I decided to go with a dual batter approach. Although it is a little more work, I can assure you that the resulting cake is beautiful, super moist, super soft, and delicious! Again, I recommend using a high quality matcha powder for a stronger and tastier green tea flavor.


Green Tea Marble Chiffon Cake
Note: We will be making two different batters to combine to create the marble effect.

Plain Batter:
90 grams cake flour
1 tablespoon matcha powder, high quality preferred
2/3 teaspoon baking powder
4 egg yolks
40 grams vegetable oil
40 grams sugar
90 milliliters water

Green Tea Batter:
90 grams cake flour
1 tablespoon matcha powder, high quality preferred
2/3 teaspoon baking powder
4 egg yolks
40 grams vegetable oil
40 grams sugar
90 milliliters water

8 egg whites
80 grams sugar

1. Preheat oven to 356°F.
2. Sift the cake flour and baking powder together. (Sift the matcha powder along with the flour and baking powder in the green tea batter.)
3. In a bowl, whisk the egg yolks, water and oil together until combined. Add the sugar into the mixture and mix well. Then in small additions, add the flour to the mixture until combined into a batter. Repeat for the green tea batter.
4. Whip egg whites until foamy and then slowly add in sugar. Continue whipping egg whites until stiff peaks form. Divide the whipped egg whites into two equal portions.
5.  Add 1/3 of the egg whites with the batter and mix to combine. Gently fold in the remaining egg whites into the batter. Repeat the same process with the other half of the egg whites in the green tea batter.
6. Fill the chiffon tin with plain batter and then layer with matcha batter in between. (You can combine the batter in any fashion you like. Play around with it to get a design you like! )
7. Bake cake for 10 minutes at 356°F. Reduce heat to 320°F and bake for another 40 minutes. To check if the cake is fully cooked, take a skewer and poke the cake from the top of the cake to the bottom of the pan. If the skewer comes out clean, it is finished! Remove the cake from the oven, invert the pan immediately and allow to cool.
8. Slice, serve and enjoy!

Wednesday, June 6, 2012

Springtime Lunch ft. Sachiko Studios & Drifting Pretty


A few weeks ago I had the opportunity to cater for the very first time for the ladies of Drifting Pretty. Needless to say the day before and the actual date was hectic but the event turned out better than expected. I'm kind of surprised because this was the first time I attempted these recipes. Heh... shame on my for being such a procrastinator but luckily my foody senses are pretty good. To make the experience even more memorable, Nadine of Sachiko Studios was kind enough to do a photoshoot for my blog. The theme for the shoot was spring and because of my natural affinity for all things Japanesey I chose to do a Japanese fusion kind of menu. The experience was awesome; you can never go wrong with good food and good company although I certainly won't mind having an assistant the next time! Apologies for not updating my site for awhile but I hope you enjoy this super epic post featuring the photography from Sachiko Studios (check out her blog here), the ladies of Drifting Pretty (check out the cool things we do here), and of course yours truly, CHIBI CHOMPS. Please enjoy my recipes for kabocha pumpkin croquettes, chashu pulled pork, and lotus root chips. We're hitting three birds with one stone in this post!


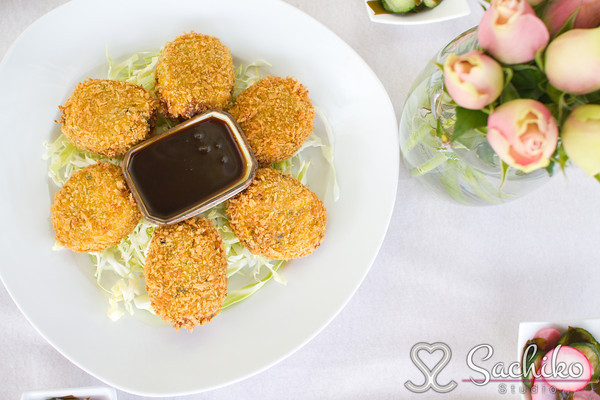
Kabocha Pumpkin Croquettes

Chashu Pulled Pork Sandwich with Lotus Chips. 
Perfect cook book cover? (;


Drifting Pretty gals. (;

P.S. I'd like to thank Nadine and Mark for taking these awesome pictures and of course my helpers during plating! 

Chashu Pulled Pork Sandwiches
6 pounds pork (boston butt with bone)
3 cups water
1 cup soy sauce
2 cups sake
2 cups mirin
1 cups sugar
12 scallions
12 garlic cloves
2 medium shallots
6 inches of ginger
Spring veggie salad mix or vegetables of choice
Sesame Seeds for garnish
Bread

1. Place all ingredients save the pork in a crock pot and bring to boil.
2. When the mixture is simmering, place the pork in the crock pot, set a timer, and relax. (Cooking time may vary depending on the crock pot but I cooked my pork for 12+ hours and it was fall off fork tender.)
3. Remove pork from the slow cooker and allow meat to rest.
4. Take the left over juices from slow cooker and simmer to reduce the liquid. When the sauce is thickened, ladle onto the pork for extra deliciousness. (I added the sauce after assembling the sandwich so the bread absorbed the extra liquid.)
5. Assemble the sandwich and enjoy.


Lotus Root Chips
Recipe inspired by Spirit House Bar. 
6 pounds of lotus root
furikake
salt
1/2 cup powdered sugar
1 tablespoon water
oil for frying

1. Heat oil to 340°F.
2. Slice the lotus root to 2-3mm in thickness.
3. To make glaze, mix the powdered sugar and water together until smooth.
4. Fry the lotus root slices in the oil until golden brown and place on a wrack to drain the excess oil.
5. While the fried pieces are still hot, brush the chips with glaze then sprinkle with salt and furikake.

Kabocha Pumpkin Croquettes
4 pounds kabocha pumpkin
6 hard boiled eggs
1 large brown onion
2 tablespoon butter
1 can corn
2 teaspoon salt
1 pinch nutmeg
1 pinch pepper
panko bread crumbs
2 beaten eggs
flour

1. Cook hard boiled eggs, set aside the yolk, and roughly mince the egg whites.
2. Cut the kabocha pumpkin into medium sized chunks (leave the skin on) and boil in salted water until soft. (You should easily skewer a chopstick through it.) Drain and mash the pumpkin while still hot. To further evaporate excess liquid, mash over low heat. When most of the moisture has evaporated, mash in the egg yolks.
3. Mince and saute onion in melted butter until soft. Season with salt, nutmeg and pepper.
4. In the pot of mashed pumpkin, mix in the egg whites, corn (drained), and onion.
5. Divide mixture into 24 equal portions. (You can make smaller ones if you like.)
6. Make flat and oval shaped patties with the mixture. Coat each piece with flour, dip in the beaten egg, and coat with panko bread crumbs.
7. Optional: Place the finished pieces in the fridge for 30 minutes prior to frying to decrease the chances of the croquette falling apart.
8. Fry the croquettes in 340°F oil until golden brown.
9. Serve the croquettes with bulldog sauce, ketchup, or mayonnaise if desired, and garnish with vegetables of your choice. (Typically Japanese croquettes are served with finely sliced cabbage.)


Wednesday, February 22, 2012

Kuri Manju

If you know me, you'd know that I am a sucker for all Japanese goodies and in particular Japanese sweets (aka wagashi). Additionally, if you do the grocery shopping or buy Japanese goods in general, you'd know that it ain't cheap. No sir. Typically different sweets go for at least a dollar a pop so why not make your own? So here is Kuri Manju: a yummy baked confection often filled with some sort of bean paste. Making manju from scratch takes a lot of effort especially if you're making it yourself but it's totally worth it in the end. I sort of cheated in this recipe because I bought premade adzuki paste and precooked/prepealed chestnuts but hey whatever works for you! Next time, I might try and lotus seed paste filling. Unfortunately I did not get to taste these clearly myself because I got hit by the stomach flu the night after making these but according to my grandpa, they were great! I hope you enjoy these as much as everyone else did.


Kuri Manju
Dough:
200 grams pastry flour (alternatively 150g cake flour + 50g all purpose flour)
50 grams sugar
25 grams butter
1 egg white
2 yolks
1/2 teaspoon baking soda

Filling:
1 package adzuki paste
1 package peeled and cooked chestnuts

Glaze:
1 egg yolk
1/2 teaspoon milk

1. Preheat oven to 350°F.
2. Cream butter and sugar until light and fluffy.
3. Lightly beat the egg yolks and gradually add the mixture into creamed butter and sugar. When incorporated, gradually add in egg white. The resulting mixture should be smooth and velvety. If it is grainy, then you incorporated the eggs too quickly.
4. Mix flour and baking soda and add it to the wet ingredients from step 2.
5. Knead the mixture until it does not stick to your fingers and comes away easily from the bowl. Wrap the dough in plastic and set aside to rest for 30 minutes.
6. Divide rested dough into 20 equal portions. (If you have a scale, I think it is best to get the weight of the entire dough and pinch off the appropriate amount as you go so it doesn't dry out as quickly.)
7. Roll the dough into a ball and flatten dough. (I did not use a rolling pin but instead pinched and rotated the dough and flattened it between my palms.)
8. Fill the skin with a walnut-sized amount of adzuki and place half a chestnut in the center.
9. Stretch the dough over adzuki and chestnut and pinch the ends together to cover filling completely. Shape as desired. Repeat with remaining dough and filling.
10. Arrange the manju on a baking sheet lined with parchment paper. Brush with egg wash and bake for 20 minutes or until tops are browned as desired.
11. Serve with tea!